Just for Fun: Archetypes – What’s Yours?

archetype circle graph

Source: http://www.archetypes.com/

Once in a while, I veer off my “gotta-be-productive” road and crash into a bunch of fun, time-sink, black hole websites. Usually this happens after the holidays, or when we’ve had a whirlwind of non-stop activities and I just want to sit, veg, and do nothing. (Yes, that really does happen.) A long time ago I hooked on the IKEA Name Generator, then there were a few graphic design generators, and games… more recently I found archetypes.com. I took a quiz on the site that basically gives you a summary of your personality type, your tendencies… and it spit out what I knew about myself, although I did expect two different archetypes. I just find personality quizzes fun – a remnant of the high-school-me.

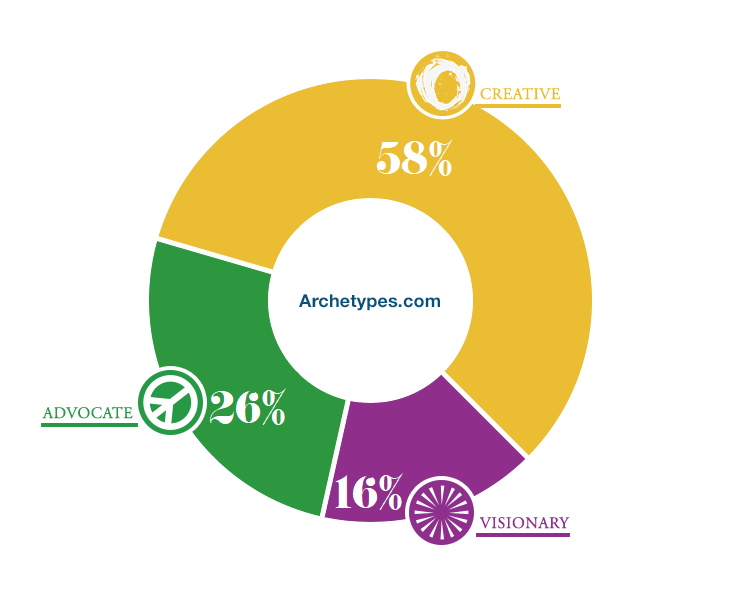
So, like the graphic shows, I have creative, advocate and visionary tendencies. And the website goes on and explains the archetypes.

  • The Creative appreciates all beautiful things, in art and daily life. The creative act is essential to who they are. Unique Challenge: To overcome the fear of being unoriginal.
  • The Advocate is the one everyone wants on their side. In the name of justice, they are not afraid to challenge authority or speak up for others. Unique Challenge: To find causes that engage my strengths, not my personal agenda.
  • Leave it to others to live by the status quo. The Visionary is interested in new ways of seeing, solutions not yet imagined, products not yet built. Lesson To Learn: To believe in my vision, however great or small, and my creative potential to change lives.

The unique challenge and lesson to learn certainly piqued my curiosity.

Which ones are you: creative, athlete, rebel, caregiver, visionary, royal, performer, spiritual, tastemaker, explorer, advocate or intellectual?

Fun with Flashlights during a Blackout

A few weeks ago a storm rolled in and down went the lights. It wasn’t even a good, raging storm. I think it was all of 5-10 minutes with high winds – and I do count our lucky stars that there wasn’t much damage.

So in the dark for almost two hours, the kids were getting a little restless. Mind you, it was only 7 pm? It felt like midnight. I thought, OH, let’s have some fun with the camera! They LOVED it. So, here are a few tips for at least an hour of fun in the dark with your flashlights.

  • The only lighting in the room were candles and the flashlights.
  • I used my DSLR on the automatic setting, no flash.
  • Focus your lens on something dim first (you know, when you hold the button halfway first before taking the picture), and then take the picture.
  • Don’t worry about a shaky hand, but do try your best to stay still. The shutter will be open longer than normal.
  • If your photo subjects want to write something in the air, remember they have to write it backwards.

Writing in the dark with flashlights: star

Writing in the dark with flashlights: heart

Writing in the dark with flashlights: squiggle

Writing in the dark with flashlights: spiral

Writing in the dark with flashlights: 2013 (backwards)

Writing in the dark with flashlights: 2013

Dimensions Felt Applique Stocking Kit Giveaway

Two weeks until Christmas. I imagine lots of scurrying, baking, wrapping. That’s me. No matter what I do, there’s always something else I want to get done, another project, another DIY gift – which brings me to this. This stocking is so cute! And I can’t wait to pull this together with my daughter… a little gift for our newest niece who will be spending Christmas with us.

Polka Dot Stocking Kit

Love that the kit comes with presorted thread, die-cut felt and a needle. It almost goes without saying that there are easy-to-follow instructions.

Felt Stocking Kit

Felt Stocking Kit

Would you like to give these stockings a home?

Dimensions felt applique stocking kits

Two readers will be chosen at random to receive one stocking kit. Just follow below and do leave a comment. Let me know which stocking kit is calling your name… however, no promises if the two of you like the same one. I know, I know, so difficult. This is a quick raffle so I can mail out the kit as soon as the giveaway is over. Of course, after I verify winners. Good luck!!

**UPDATE** If you would prefer NOT to enter through Rafflecopter, just e-mail me at jtiu(at)comcast(dot)net with “Stocking Kit” in the subject line. Good luck!

a Rafflecopter giveaway

Making Bottle Cap Magnets: a Mini-Tutorial

Last week my daughter and I were having fun on Election Night. Here’s the long version of what we were up to. I only call this a mini-tutorial because there’s not a whole lot of science that goes into this. You can make all sorts of miniature art using regular bottle caps… clearly, you can see how much we’ve been holding onto. Stores carry blank bottle caps and bottle cap kits for art and jewelry, too. We gathered all sorts of supplies like sequins, confetti, rhinestones, glitter, scraps of cardstock and patterned paper, newspaper, glue, Mod Podge and magnets.

Just glue and stick your doo-dads… recycle cards, even newspaper ads! They all start to look like potential mini-magnets. (It’s probably easier cutting out circles with a round punch, but I went old school and used my engineering compass.)

While your art is drying, it’s a good idea to weigh them down if the paper starts curling up. Just use a little plastic wrap and coins or, if you’re nerdy like me, little scale weights.

We let our bottle caps dry overnight, then added some Mod Podge dimensional magic to get them glossy and pretty. Glue your magnets and you’re done! You could package a little set as a gift or party favor… I really like this tutorial on glass magnets for packaging.

Wordless Wednesday: Bottle Cap Magnets

Mini-tutorial coming soon…

Collection of Bottle Caps for Crafting

Use magazine or newspaper cut outs for Bottle Cap Magnets

Bottle Cap Magnets: Decoupage medium drying

Election Night Crafting results

Related Posts with Thumbnails