Hope you all had a nice President’s Day weekend… more fun this week with a birthday party coming up.
For today’s mugshot, I’m sharing chrysanthemum tea at dim sum and one of my favorite quotes.

![]()
Hope you all had a nice President’s Day weekend… more fun this week with a birthday party coming up.
For today’s mugshot, I’m sharing chrysanthemum tea at dim sum and one of my favorite quotes.
![]()

I don’t start my day without a hot beverage. And, we’re an equal opportunity household – coffee and tea – with a pretty diverse selection at home. From Ethiopian Harrar (we heart Valhalla) to Starbucks Christmas Blend, from Earl Grey to Peach-Mango, Sweet Lychee to Yunnan – I brew them both.
But there’s nothing like stopping into your favorite spot for your cup o’ joe, or maybe you frequent a tea place. I’m soooo lucky that there’s a local tea shop. I’ve mentioned TeaLula before. I visit with my kids, my husband, by myself… TeaLula, how we love you so. And it’s not just a shop with all things tea, and a hundred different loose teas, it’s an oasis for me. And I feel like we’ve made some very nice friends over the last couple years…

You know when you go to a restaurant and order the same thing every single time? I thought it might be nice to start off the year with something… new (innovative, I know). Since I visit TeaLula on a fairly regular basis, I thought it might be fun to journal about the brews. Recently I tried a white tea, Spiced Pear Bai Mudan. Mmmmm. Sounds like it could be a swanky cocktail. Instead, it’s a swanky tea.

Bai Mudan is tea from the white peony. This blend has some star anise, sweet pear and see the helichrysum flowers? Adding a bit of sugar made the flavors more defined. Lovely. It’s light, unlike a black tea, and this blend has a fruity aftertaste with a surprising cooling sensation. Almost minty… it lingers on your tongue. (Made me want more, just so I could figure out what that taste was.) My daughter said only two words after sampling the Spiced Pear Bai Mudan: melted pears.

More flavors and tidbits from the tea bar next week month!
If I don’t get back here before the weekend, I wish everyone a happy Chinese new year!
On the return flight home, I was feeling a little fidgety. No crafting for about two weeks… but since I went to Urban Craft Uprising and saw lots of handmade goods around Granville Island, Canada, I was antsy. So, to pass the time, I started thumbing through the airline magazine. The semi-finished sudoku and crossword puzzles didn’t capture my attention that much, and I had read through the steakhouse directory too many times. Onward to the Sky Mall magazine! I enjoy virtual shopping as much as anyone else especially when one magazine has business books-on-tape, concrete garden fountains and pet gear under the same cover.

But that didn’t last too long either… without scissors, glue, knitting needles, or even a crochet hook, what was a girl to do? (Incidentally, these are all probably unsafe or inappropriate things to bring on a plane now.)

I made a paper tree! Actually I made two: one on the way to Phoenix and the one in the picture was on the way home. I both cases I left them on the plane. Someone (cleaning crew, probably) might have found it interesting, or at the very least, amusing? My husband called me the “(paper) tree bandit”. I thought of it as free art. Want to make some on your next plane ride? It’s really easy, and the instructions are here.

I made this card several years ago for a friends on their wedding anniversary and then again for Christmas. I thought Valentine’s Day might be a nice time to resurrect it. What better to hold a little teabag, candy or gift card? It’s also a nice way to recycle crinkly paper from gift baskets, and odd pieces of cut paper and ribbon! I suggest using a padded envelope or hand deliver your creation to your friend. Here’s my simple “basket” card that I’ll take you through.

For the card, you will need:
1. Fold your cardstock in half if you haven’t already. Position the card so it is fully open. You will glue (or tape) your coordinated paper to the inside top half of the card. This might look strange, but hang on.

2. Close the card and on the bottom front face (just the other side of where you glued), mark a point at 2-3/4″ (exact center) from the edge. You may also want to mark 2-3/4″ up the two sides also, but this is not necessary. It’s the height of the printed paper.

3. Take a bone folder or some blunt tool to score the paper from the bottom mid-point to the top edge of the printed paper (along the side of the card). You’ll have two right triangles that will become the “basket”.

4. Fold the triangles up and use a bone folder to crease well. Almost done!

5. Punch holes at the top of the triangles for your ribbon and tie a pretty bow.


6. Use some leftover crinkly paper and place your favorite tea to share.

You’re done, good job! For some more fun, you could rubber stamp some cute designs all over the cardstock. Don’t forget that you’ll have a small amount of writing space inside the card since the front is folded over.
Here’s an extra little tidbit. You know those paint chips you get at the hardware store when you’re thinking you’re going to actually paint that ONE room… Use your paper punch and attach to some long toothpicks with glue or tape!


Hoping to have a few more Valentine’s Day resources for you tomorrow. Enjoy!
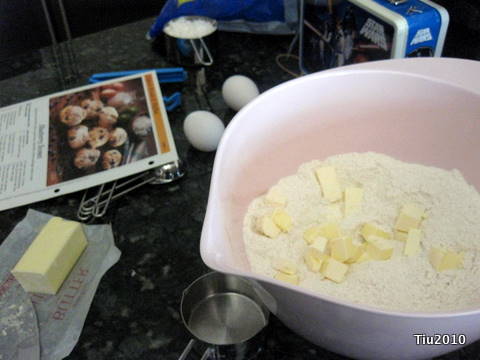
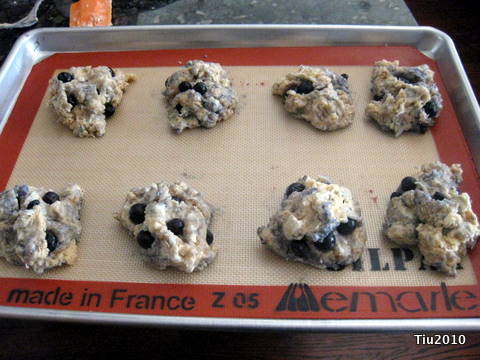
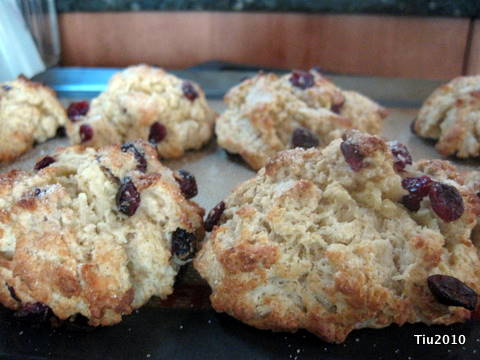

I was craving scones the other day, and usually, Ollie and I take a little trip to our favorite tea shop to have delicious raisin scones and tea. But we didn’t make time. (Sorry, Sheila.) After mentioning this to Eastman, he said, “Your scones are the best.” Aww, thanks, honey. Then I realized, I haven’t made scones at home in a long time. This recipe has been a staple in our home since we’ve been married. It’s easy to double, which you might want to do… easy to make with preparation time of 15 minutes (give or take some if you do or do not have everything on hand), and easy to wait for (15-20 minute bake time).
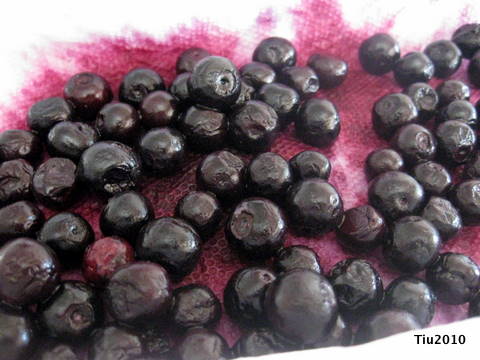
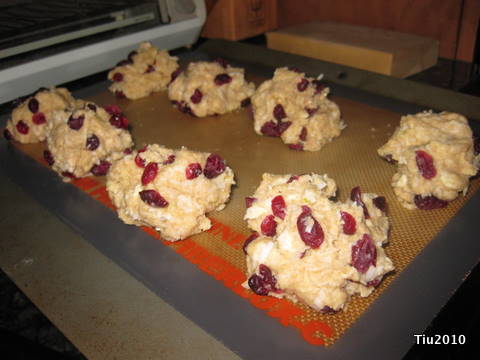
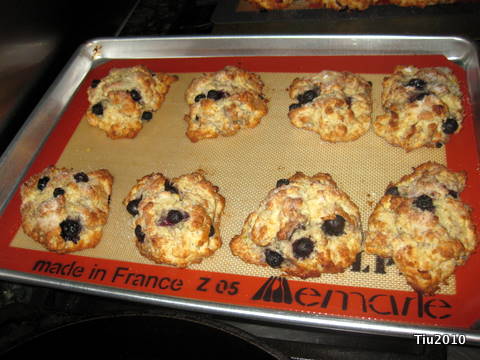
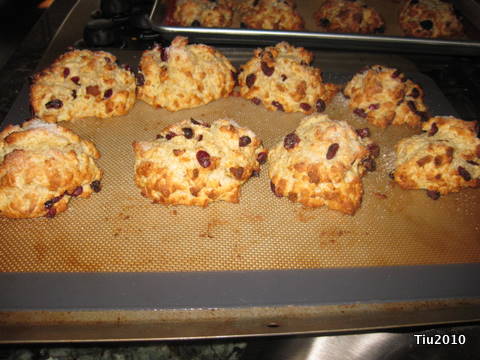
The lime and coconut flavors are so subtle, and really accompany the blueberries well. I have a friend who claims he hates coconut, and then proceeds to consume my coconutty-baked goods. Making this with dried cranberries works too, but I would suggest rehydrating the cranberries in warm water while you’re preparing the batter. Once in the oven, it’s magical to watch the scones puff up and get golden brown if you’re not doing anything else. Unfortunately, I wasn’t watching them closely and this batch browned a bit more than I would have wanted.
Julie’s Scones (Yield: 8 scones)
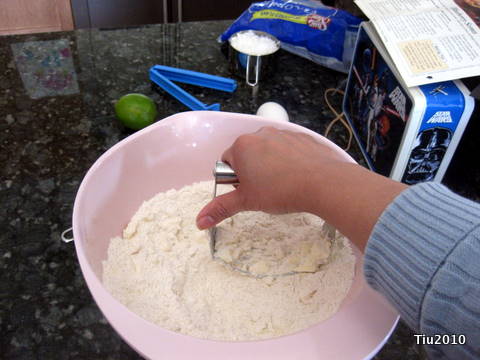
Preheat oven to 425 deg. F. Grease baking sheet or prep with a silicone mat or parchment paper. Mix flour, baking powder, salt and sugar in a large mixing bowl. Using a pastry blender (or 2 knives), cut butter into dry mixture until coarse crumbs form. Make well in center. In another bowl, mix egg, coconut, milk and lime peel. Pour egg mixture into flour mixture. Stir with fork until dry ingredients are just moistened. Gently fold in the berries. Spoon scones about 2 inches apart. Sprinkle tops with sugar. Bake until golden brown, approximately 15-20 min. Cool completely.
Oh my goodness, one and a half days without internet access from home is brutal. We rely on it so much! Looking up recipes, sending e-mail, reading the news, reading my favorite blogs… Even our little one was suffering withdrawal from not being able to log onto The Disney Channel’s webpage. Anyhow, after an hour the cable technician was able to diagnose some loose cables outside our house and he found a nick in the cable that comes from the main line. Apparently he put in an order for the line to get replaced. Who knows when that will actually happen.
But what I really wanted to write about is The Ferry Building. I really don’t know if we have something similar to this in Chicago, so you can only imagine how excited I was to walk into this place with all these specialty food shops! My husband spent $50.00 within 30 minutes… it was so easy to do. I did visit some plant/garden/gift shops, too, but our main focus was on the eats.

For the mushroom fans, Far West Fungi. It was strange that no one seemed to be working there at the time… kind of eerie. Unfortunately, we didn’t really visit too long, but it was neat storefront.

Imperial Tea Court had a great selection of loose teas, but what we were really looking for was…

…this place! Boccalone! Their tag line reads, “Tasty salted pig parts”. How awesome is that? This place was featured on Food Network recently, and we just had to try the salumi cone. Deliciously salty and fatty. It can’t possibly be good for you. We did bring home some nduja, spreadable salami, along with some cheese from Cowgirl Creamery. A $20 grab bag of cheese and a little cheese knife.


Scharffen Berger chocolate… oh my dark chocolate goodness. The kids were so good in the store. You’d think they might go nuts in a place that has samples at every turn, but no, they were very well behaved and Abby really impressed the staff with her taste for 60%-70% dark chocolate. “Your daughter has a surprisingly mature palate.” Why, yes, thank you very much.

We ended our little foodie excursion with dinner at Taylor’s Automatic Refresher, a casual diner but with some upscale diner meals. We caught up with my college roommate (daughter’s godmother) and her new husband of one year (happy anniversary!!). I tried the Ahi Burger and we also ordered the Grilled Mahi Tacos. Fresh, delicious, light… mmmm. I’m sure the beef burgers were great, but we definitely wanted to try the seafood.

I think this pretty much sums up the day. My kids are such troopers when it comes to their dad and me dragging them to all these specialty groceries and food markets.