Snowflakes Paper Punch Mini Review and Stamps-Stickers Giveaway

Last week I was playing around with EK Success Snowflake Layering Punch. It’s a dream to use on cardstock, scrapbook paper, even cardboard cereal or snack boxes. I tried it on thin kraft paper and while it punched out a shape just fine, I found the paper too thin and some paper ripped. No fault of the punch. I wouldn’t use it on tissue paper or crepe paper for the same reason. The snowflake punch is available online and in most craft and hobby stores.

EK Success Snowflake Layer Punch

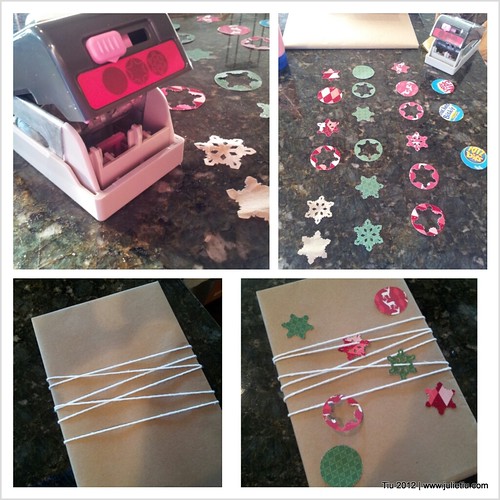
The great thing about the paper punch is that you get three different shapes from one punch. You slide a lever for the shape you want. Why would you want all those shapes? You could layer them and get a nice dimensional doo-dad to stick onto a card or scrapbook page.

In my case, I dressed up a plain wrapped gift for my nephew with the punches… I’m trying a minimalist look with kraft paper and yarn. I don’t knit or crochet, but somehow I’ve dug up a few skeins of yarn around here. Weird. But, look, it’s simple and festive. Make your wrapping thematic with any paper punch, or color of yarn.

Along the lines of snowflakes, how would you like to win this gift pack?

Snowflake stamps and stickers

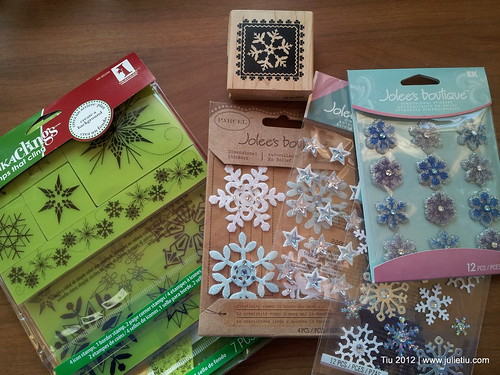
It’s from the same fine company who makes the snowflake paper punch… and I really appreciate EK Success for giving me the opportunity to share these cool supplies with you. (Approx. value $45) Just follow the instructions below. You’ll have to comment for a chance to win, and entries will be taken until midnight, 12/15/12. Thanks!

**UPDATE** If you would prefer NOT to enter through Rafflecopter, just e-mail me at jtiu(at)comcast(dot)net with “Snowflake Stamps and Stickers” in the subject line. Good luck!

a Rafflecopter giveaway

Book Review: The Adventures of Little Mouse

The Adventures of Little Mouse (Williams)


“True friends are the ones you can count on to be there for you…”

The Adventures of Little Mouse: (Life outside the Mouse Hole) by Sherri Williams (AuthorHouse, 2012, 43 pgs.) tells lessons of friendship, listening to your parents, and making good choices. Williams uses a family of mice and short stories in this book to demonstrate decision-making and consequences for young readers.

The Adventures of Little Mouse (Williams)

This is unlike most of the books I review (projects and crafting), but this author is also an avid quilter and has developed quilt designs based on each story. (Her designs are also available online.) I read this book aloud with my 6-year old and felt that it was appropriate for his age group. I’d say it targets kindergarten through third grade.

The Adventures of Little Mouse (Williams)

From Julie Tiu|Picasa Web Album

The twelve short stories cover topics like being a good friend, helping others, being careful, but I feel the overall running theme is that you don’t always appreciate what’s right in front of you (i.e. your home life, family) and parents are just looking out for their kids. A theme of being cautious almost seems too forward in some cases, but definitely a good lesson for little ones.

If you’d like a copy of this book for yourself, The Adventures of Little Mouse: (Life outside the Mouse Hole) retails for $21.00 (softcover) at most bookstores and is also available on Kindle for $3.99.

Leave a comment here for an opportunity to win a copy for yourself. It makes a nice stocking stuffer for your special youngster! I’d love to hear from you and send you this book… Comments welcome until Thursday, Dec. 6, 10 pm CST.

Monogrammed Glass Tile Ornament Tutorial

I love making handmade ornaments to hang on the tree, to use as gift decorations… but I never seem to make enough time to do many. A year ago, I came across an etched glass ornament and thought there could be a less messy option… rub-on letters makes this possible!

Glass tile comes in sheets, and if you’re lucky, you can find a bunch in the clearance section. One sheet can cost about $4 which is inexpensive considering you can make 16-18 ornaments. But I recently found some tile going for under $2! Now a few pieces were chipped, so you have to make sure you check the sheet before you purchase.

What you need
• Glass tile from the home improvement store
• Glass cleaner of choice
• Scissors
• Rub-on letters
• Burnishing tool (popsicle stick will do)
• Ribbon (I used 1/8” and cut into 4”-5” segments)
• Glue (appropriate for glass)
• Optional: decoupage glaze (like Mod Podge or clear acrylic medium), fine-tipped brush

Before you begin, dust off and clean your glass tile. (Materials from the store always come home with a nice layer of dust.)

The tiles are bound together by a mesh and it’s not difficult to cut with a regular pair of scissors. I wouldn’t necessarily use a fancy pair – any office pair will do. The cool part is you can just cut apart what you need and store the rest if you aren’t making a big batch of ornaments.

Cut a pair of matching tiles, or unmatching. I like a matching “sandwich”. After cutting, you’ll need to peel off the mesh. Thankfully, it comes off easily.

Prepare your rub-on letter. I centered the monogram on the very bottom of the tile then when I was happy with the placement, I rubbed (burnished) the letter onto the tile.

No need for drying time at all… you’re done. However, if you’d like, this is when you would use a fine-tipped brush to go over the rub-on letter with a little clear sealer to prevent scratches and “erasing” the letter.

For the hanger take your ribbon, and fold in half. Center it at the top of the tile, and stick in place with a dab of glue. Spread more glue, like you’re dressing a sandwich, then top with another glass tile. Gently press (so you don’t get glue smooshing out) together for a few seconds. Let the glue set at the manufacturers recommended time.

Hang on your tree! Or adorn someone’s gift!

Would love to know about your favorite handmade ornaments… want to share? Two of you will be randomly chosen to receive some fun Jolee’s stickers (the top group and bottom group). Leave a story, a comment (and a link, if you have one) by Tuesday, Dec. 4, 10 PM (central time). Thanks!!!

Happy December (and some wishes for you…)

I took a longer break than I anticipated… got the flu. Full-blown flu. I was so mad and miserable last week. Got our Christmas tree up after Thanksgiving, nursed a sick son back to health and then got sick. Achy, feverish, and my voice sounded like Darth Vader most mornings. *sigh* So, here we are. Getting healthy.

We’ll have to play a little catch up in the next week, but just want to officially start the holiday season by wishing everyone the best. I hope…

…your handmade projects and gifts are finished on time,
…your classic family dishes turn out well on the holiday table,
…your cookie wins first-place or most favorite at your annual cookie exchange,
…your shopping is almost or already done (and gifts are wrapped),
…your holiday guests are gracious,
…visions of sugar plums dance in your head,
…your wishes come true, and
…for these next few weeks, I hope we don’t lose sight of the real meaning of Christmas. (I love Charlie Brown.)

Cheers!

DIY Decoupage Beer Label Coasters Tutorial

DIY Beer Label Stone Tile Coasters

These are fancy looking, but oh so easy to do with some simple materials. Again, I feel like I need to mention that there are lots of decoupage coaster tutorials out there. All are very searchable, and use everything from color copied photos, scrapbook paper, scrap fabric, wine bottle labels… my coasters use local beer labels. Great gift idea for a host, or that beverage aficionado in your life!

You need:

  • Water
  • Tub or mixing bowl large enough to submerge your bottles
  • 4″ x 4″ Stone tiles (found at your home improvement store in the flooring section)
  • Foam Brush
  • Mod Podge, or some acrylic decoupage medium
  • Felt (adhesive-backed)
  • Optional (but useful): Safety pin or dressmaker pin, plastic card (i.e. used gift card), very fine sandpaper, clear acrylic spray

**OH, when you’re looking at the tiles, check them for chips and dings before you purchase. People pick through them!**

First, you’ll want to remove your labels. I filled our empty beer bottles with water, then submerged the bottles in hot/warm water in a large mixing bowl. Actually, I left it overnight, and in the morning, the labels were super easy to remove. No rips, no shredding. Lay your labels down to dry. (Now go put your glass bottles in the recycling bin…)

Prep your stone tiles by wiping down with a damp towel. They get pretty dusty at the home improvement store. Assuming your labels are dry… use your foam brush and apply a thin coat of Mod Podge to your tiles, nice and easy. Place your labels where you want them, and then press them down firmly.

You’ll get tiny air bubbles, air pockets, because stone tiles are bumpy and porous. Just work out the bubbles gently with your fingers (or plastic card) from the middle of the tile and outward. This is also when you might find a pin handy. I would gently poke the air bubble then push the air out with my finger. Let the tiles dry for about 15 minutes.

After 15 minutes, check your tiles. They will feel tacky, but you can touch them. Add another coat of Mod Podge, and work out the air bubbles, and let dry. Repeat two or three more times. I painted five layers, each time working out any air bubbles with a pin.

Let your tiles dry completely overnight, or 24 hours. If you don’t like the tacky feeling, which I don’t, you can “wet sand” your tiles with very fine sandpaper. I wet a small piece of sandpaper and just went over the tiles. Your decoupaged skin won’t be messed up at all… it will become smooth. Skip the sanding (or not), then just seal with clear acrylic spray, following the manufacturer’s instructions.

Lastly, cut 3-1/2″ x 3-1/2″ felt squares and glue under the tiles, or if it is adhesive-backed, just press into place.

DIY Decoupage Stone Tile Coasters

Beer Labels decoupaged onto Stone Tiles