Birthday Favor Ideas

Birthday parties have always been a fun and memorable event growing up. When we were really young, opening presents and goody/loot bags were the best things ever… I remember getting dot candy on paper strips, the fortune fish you’d hold in your hand that curls up, stickers, tattoos and the plastic trinkets and jewelry that my parents hated so. What a treasure it was to us but was so easily forgotten.

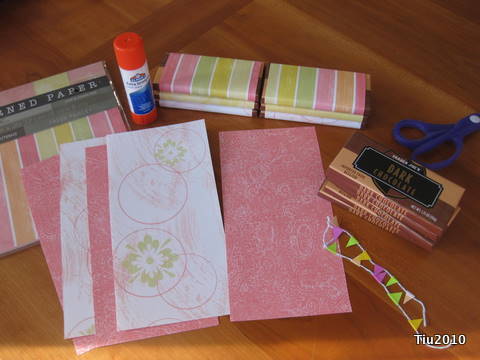
After last year’s Webkinz party at home, we went the other way and hosted a few friends outside and went simple on a take-home gift: One of Abby’s favorite things to eat, dark chocolate. She prefers Scharffen Berger (she’s such a foodie already), but also loves Trader Joe’s dark chocolate. So, we bought a few bars and to dress it up, I took some scrapbook paper and die-cut shapes that coordinated with her favor colors and wrapped the bars. Very simple and cute, just like my kid.

Other thoughtful ideas:

  • Giant, decorated sugar cookie that ties into the party theme (i.e. Butterfly cookies from a local bakery for an outdoor or spring themed party or these cookies)
  • Small cellophane bag of a favorite candy (M&M’s), tied with curling ribbon
  • Thank you cards with a picture of the guest of honor along with friends.
  • Picture CD’s of the party
  • Small bud vases with seasonal flowers

Post-Valentine’s Day gift inspirations

Why should we limit giving cards and greetings to our loved ones to Valentine’s Day? We shouldn’t, right? Here are some inspired projects that you might enjoy and I plan on sharing with some of my friends this year in my quest to stay in touch better and bring a little happiness to other lives.

picture from Merriment Design

Vintage Silhouette Embellishment from Merriment Design

Antique Style Valentine at Martha Stewart

Rough and Ready Recycled Notebooks from The Lucky Ladybird Craft blog

With Valentine’s Day and Chinese New Year behind us…

  • We’re looking forward to celebrating Mardi Gras at our church tomorrow night at a fundraiser dinner for the children’s religious education program,
  • We’re also getting ready to celebrate my daughter’s birthday this coming weekend. Get ready for birthday crafts and stories.
  • Update on my exercising! Spinning 1st week – 4x, last week – 2x (shoveled 3 days out of the week and was exhausted!). Also went to yoga class and added pilates to the mix. Feeling good, a day at a time.

Happy Monday, my friends!

Valentine’s Basket Card

I made this card several years ago for a friends on their wedding anniversary and then again for Christmas. I thought Valentine’s Day might be a nice time to resurrect it. What better to hold a little teabag, candy or gift card? It’s also a nice way to recycle crinkly paper from gift baskets, and odd pieces of cut paper and ribbon! I suggest using a padded envelope or hand deliver your creation to your friend. Here’s my simple “basket” card that I’ll take you through.

For the card, you will need:

  • 4-1/4″ x 5-1/2″ piece of cardstock (half of 8-1/2″ x 11″ paper and folded)
  • 5-1/2″ x 2-3/4″ piece of coordinating printed paper
  • 9″ – 10″ ribbon
  • Miscellaneous: ruler, pencil, bone folder, gluestick or double-sided tape, hole punch

1.  Fold your cardstock in half if you haven’t already. Position the card so it is fully open. You will glue (or tape) your coordinated paper to the inside top half of the card. This might look strange, but hang on.

2. Close the card and on the bottom front face (just the other side of where you glued), mark a point at 2-3/4″ (exact center) from the edge. You may also want to mark 2-3/4″ up the two sides also, but this is not necessary. It’s the height of the printed paper.

3. Take a bone folder or some blunt tool to score the paper from the bottom mid-point to the top edge of the printed paper (along the side of the card). You’ll have two right triangles that will become the “basket”.

4. Fold the triangles up and use a bone folder to crease well. Almost done!

5. Punch holes at the top of the triangles for your ribbon and tie a pretty bow.

6. Use some leftover crinkly paper and place your favorite tea to share.

You’re done, good job! For some more fun, you could rubber stamp some cute designs all over the cardstock. Don’t forget that you’ll have a small amount of writing space inside the card since the front is folded over.

Here’s an extra little tidbit. You know those paint chips you get at the hardware store when you’re thinking you’re going to actually paint that ONE room… Use your paper punch and attach to some long toothpicks with glue or tape!

Hoping to have a few more Valentine’s Day resources for you tomorrow. Enjoy!

Designing gift tags and Chinese New Year cards

Color, pattern, texture, shine…So simple and brilliant. It’s my favorite design rule, and I’m still learning (since I’m not even close to having studied art design). The best part is it works for putting together an outfit, a room, a gift tag?! Actually, it didn’t start out that way, but when I looked at the final products it sort of jumped out at me: red, lots of patterns that give off lots of texture and the tag is shiny. Last week, I was scribbling and working on the last of this series of five when I accidentally spilled my tea on them. Ugh. After some quick blots and a night sandwiched in paper towel and phone book pages, they survived with little water scarring. Sharpies are awesome.

More scribble art

These tags were meant to be maybe a first offering on Etsy… maybe…with Valentine’s Day and all. But, with the slight water damage, I wouldn’t feel right about selling them. So, I started on some other ones. The third from the left isn’t quite done. Then I tried one with the new Copic Multiliners; that one smudged.

Scribble art turned gift tags

Shiny paper and Copic markers don't work as well

While I took a small break from putting away Christmas decorations, I started thinking about Chinese New Year, the next holiday we’ll be celebrating in this house. (I have Holiday A.D.D.) There are these Chinese zodiac rubber stamps and a variety of Asian themed stamps I want to use.

Let’s see how this pans out over the next week or so. I should have some time to work on them with the big snowstorm and freezing temperatures coming our way.

Recycled Cardboard Box Notebooks

Recycled Cereal and Product Boxes

This is too much fun and too easy. I love making little gifts for little friends. These recycled cereal box (snack box, pasta box) notebook is just too cute. They’re all drying right now in my kitchen because my basement crafting table is completely cluttered with other projects in progress. (This is why I think I have crafting A.D.D. but that’s for another time.)

So… I was cutting and breaking down all these boxes and saving them in a container (not cluttered). I’m sure my husband thought I was nuts, becoming a hoarder. (See honey, I’m using them!!) I took all the scrap paper I was using for computer printer paper (like backs of school notes, school homework, junk mail with blank sides, etc.) and cut them down to the sizes I needed. I tried to stay with either half sheets (5-1/2″ x 8-1/2″) or quarter-size (4-1/4″ x 5-1/2″).

My dilemma was figuring out how I wanted to bind the books. I actually tried handsewing one book. There are tons of how-to’s online (like here or here), but in the end, it just didn’t look the way I wanted it to. I could have (COULD HAVE) just gone to the office copy place to have them bind the books with a comb, but I really wanted to stick with an all-recycled type of project and, dare I say, I’m frugal. Here’s how I chose to bind.

Just pick your covers, take your sheets of paper and clamp together. I kept these to 25-30 sheets each so clothespins are perfect. White glue is an amazing thing. Just squeeze some down the side you want as a spine, let dry a little, and then do a second application. The book is practically done at this point, and that’s where I am in the picture. What I have left to do is to make a nice, skinny spine cover with solid colored paper like craft paper or maybe even brown paper bag? We’ll see what I have in my paper bin.

Happy recycling.

Crafting Last Week

It was a great turnout at the Craft Social last Friday night! Special thanks to the Craft Social team! Lots of great women came by and doodled with me: Katie, Lindy, Jen, Susan, Karen, Sarah, Susie, Simone, Krissy… wish I had a sign-in sheet so I could remember everyone’s name. Well, there were at least 26 people at the table because I came home with only four handouts. These crafty colleagues were so fun to talk and brainstorm with. My head was spinning when I got home. Good thing I had yoga on Saturday morning. It helped calm me down. I think the future might hold some special projects – I’m checking into the possibilities and will report on them.

On another front, from my sewing table:

Baby Blanket with ribbon tabs

This baby blanket was shipped to my long time friend, Jen, and her husband. They had a new addition to the family, and I was finally able to sit down and sew this. It was my first time working with the cuddly, soft, “bumpy” fabric. Not too bad, but I did have a little trouble with it bunching every so often. The ribbon tabs are a fun add-on for babies, and not that difficult to do. I think choosing the ribbons was harder. At the time of this picture, I hadn’t finished the topstitching around the border, but you get the idea. Abby felt like trying it out for a minute before I washed it the final time.

Testing the baby blanket

My little guy kept himself preoccupied with this puzzle while I finished up. I’m so proud of him.

Boy Genius

Related Posts with Thumbnails