Favorite Posts from 2012

Hi everyone. Hope you enjoy this look back at some of my tutorials and recipes from the year. (I hope the links all work back to the original post! ACK! Might need to work on this still. The pictures aren’t linked, but the posts are all listed underneath.)

This year did not fail to amaze me… the good and the bad. But sharing ideas and meeting many of you near and far has been such a highlight of my year. I’m thankful and humbled by your continuing readership and friendship. May 2013 bring all of us peace. Blessings to you, friends!

Favorite tutorials and recipes from 2012


Recipe: Chicken Broccoli Braid

When my husband works late, or is out with the guys, my daughter will ask if I can make this for dinner. Like it’s her “mom-kids night” favorite? It’s cute to hear her say, “Ooh, chicken braid…” This time she helped put it together. Easy, so easy to make when you have some leftover chicken and broccoli. You could even use a bag of frozen broccoli (it comes in 12 oz. bag – perfect amount). Just thaw in the microwave. Just know, it’s not an original recipe but one that’s been changed to satisfy my family. I’m sure you can find countless recipes online, but here’s mine – a simple meal, easy brunch pot-luck dish… or even an appetizer. Use up leftover chicken, leftover broccoli… I bet it’d be tasty with an Italian spin of spinach and mozzarella! Let me know if you try it out!

Chicken Broccoli Braid (inspired by original Pampered Chef recipe)

Minutes to Prepare: 20
Minutes to Cook: 20-25
Number of Servings: 8-10

½ cup (4 ounces) shredded cheese (sharp cheddar, four cheese blend, mild cheddar)
½ cup mayonnaise
2 teaspoons dry oregano (Could use dill but my hubby doesn’t like dill too much)
¼ teaspoon salt
2 cups cooked chicken, cubed or chopped (I had a bit less, 1-1/2 cup seemed to be okay)
1-1/2 cup broccoli, chopped
1 garlic clove, minced
2 packages (8 oz each) refrigerated crescent rolls
1 egg, lightly beaten

Preheat oven to 375 degrees. In medium to large mixing bowl, add cheese, mayonnaise, herbs and salt. Mix well. Incorporate chicken, broccoli and garlic to mixture. Set the bowl aside while you prepare the dough. Unroll crescent rolls – do not separate. Place both packages of rolls on a large cookie sheet side by side. Press seams together to form one long sheet of dough. Along outer side of dough, along each of two opposite sides, cut 1-inch strips from center toward end. Add filling down the center of between the strips. Don’t worry if it looks like a mountain…

Braid construction: Lift strips of dough, one at a time, at slight angle. Strips will meet in the center across chicken mixture. Continue alternating strips to form a braid. Tuck ends up to seal at end of braid. Brush with egg wash. Bake 20-25 minutes or until golden brown.

Rice Krispie Sushi Recipe Tutorial

These are more like instructions rather than a recipe since you’re not going to cook a thing! We served these at a party where kids and grown-ups gave us great feedback about the rice krispie sushi. This might be something fun to do for a kids (heck, for adults, too) birthday party, a potluck? If you gave up sweets for Lent, this is a sugary way to break your fast.

What You Need

One batch of prepared Rice Krispie treats
Cooking spray (like Pam)
Candy: Swedish Fish, Fruit Roll-ups (fruit leather, preferably dark in color), cake decoration sprinkles

For the Nigiri (hand-rolled) Sushi

Spray or coat your hands lightly with cooking oil. Butter, magarine works okay too. Create an oblong mound of rice krispies in the palm of your hand. Top with a Swedish fish and wrap with a thin strip of cut fruit leather.

For the Maki (rolled) Sushi :: inside-out roll featured in first picture

This one is a little trickier. Make sure your hands are well coated. Using your hands or a rolling pin, you will need to press or roll the rice krispie treats to a thin thickness. 1/4″ – 1/3″ inch should work. Swedish Fish in a row along one end of your prepared rice krispie treat. Roll the end of the rice krispie treat up and over the candy fish until they are covered.

(I have to say, at this point, we forgot to add strips of fruit roll-up for the “seaweed”. Lay down some fruit roll-ups before the Swedish fish. You can see it better in the very first picture of this post.)

Trim away from the remainder of the rice krispie treat. Shake some sprinkles on the roll (like sesame seeds), and using a sharp, buttered knife, cut into circles – like you would cut cookies.

For regular maki

You’re going to follow similar directions as above, but save your strips of fruit leather, and roll it around the rice krispie treat after you’ve cut them into shapes.

If you attempt to make these, I love to hear how it turns out! Share your pics and links! Enjoy…

Candied Orange Peels (Revisited)

Been sick as a dog for about one week… thought this might be a good time to look back at some favorite recipes like the time I made candied orange and lemon peels. I think I may do this for a baby shower favor next month – a cellophane bag, scrapbook paper in the party colors, some twine or raffia. Perfect.

(First posted March 26, 2009)

Lemon and Orange Peels Drying

Over the weekend, a friend brought over the most beautiful lemons from her parents’ lemon tree. Note, we’re in Illinois. Her parents’ tree is in Arizona. She was sharing because her folks had a bumper crop this spring. My friend was greeted by 3 dozen lemons… what to do, but share! She mentioned juicing the lemons and freezing the juice in ice cube trays. Then she mentioned saving the peels to candy them. Aha! Lemon, citrus, orange, citrus… helloooo?! I thought it’d be delicious, AND I was planning on making some candied orange peel this week. I’m experimenting with frozen peels; thawing them first and then continuing with the typical recipe.

Just type “candied orange peel” in your favorite search engine and there are tons! They’re all basically the same. Mine isn’t that different.

  • Peels from 4 – 6 oranges (this time around, I also had 2 lemons): The peels were in sliced sections and the pith (white) was already trimmed. You want very little pith, but I still leave a bit. I sliced these into 1/4″ strips. The lemon peels were smaller.

After 1st blanch

Using a 3-1/2 qt. pot, I filled it with about 4 cups of water. This should be enough to cover the peels. Heat until boiling, then add the peels. Blanch the peels for about 3-4 minutes. Turn off heat, drain/remove the peels (I just used a slotted spoon not a colander), discard water and repeat. You will blanch the peels 3 or 4 times. This is to soften the peels, but more importantly, to remove the bitterness. It sort of cooks out, cooks down any pith, too.

  • 4 cups water
  • 3 cups granulated sugar
  • Extra granulated sugar in a separate container for dipping

In your clean, empty pot, combine the water and sugar. Heat until you get a rolling boil. You can use a candy thermometer, and heat until 210 degrees. Add peels, boil for a couple minutes, and then lower heat to a simmer. Continue to simmer peels for 45-60 minutes, or until peels are translucent. (I’ve read recipes where they only simmer for 30 min.)

Newly candied, before sugared

Remove peels after they are to your liking and dry on a cooling rack. While still warm, dip the peels in sugar and lay out on the racks to dry. I like to leave them out overnight. The next day you can take the dry candied peels and dip or drizzle with chocolate!

The workbench

After sugar dip

I love the blast of citrus flavor (not to mention the sugar), and it doesn’t take but just a couple pieces to satisfy your taste buds. This sweet treat is also gluten free, a big plus for friends with allergies!

Irish Stout Coffee Cake with Chocolate Chips and Bailey’s Icing

With St. Patrick’s Day coming up, I thought it would be fun to cook with some Irish beer. I really wanted to try making something with a stout other than Guinness, and ended up with Murphy’s Irish Stout based on a recommendation from our local liquor store.  It’s dark, smooth, coffee-ish, sweeter than Guinness (if you’re into sweet). Made me want to eat some chocolate… seemed like dessert was in order!

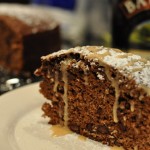
Here’s my take on an Irish stout coffee cake – it’s dense and moist, not like a birthday cake. The recipe below is exactly what you see in the picture. My daughter helped mix the gooey batter. She had some choice words about what it looked like. You can only imagine what a ten-year old might say. My finished cake lacked a little sweetness, but there was good malty flavor. I’m probably going to make it again next weekend, and will add 1/2 cup of sugar and a streusel topping. I think a little crunch on top would add some nice texture and sweetness. I’ll let you know how that goes.

The stout cake definitely went well with my morning coffee (good morning to you too), and it goes well with after-dinner coffee or drinks too. Well, it’s not that light so maybe hold off a little while after dinner. And, the Bailey’s Irish Cream icing – yum. When it came time to taste, my trusty assistant had a couple bites – no icing – and was done. Note: The cake may not be for the younger palate.

If you bake this, I’d love to hear how it turns out!

Irish Stout Coffee Cake with Chocolate Chips and Bailey’s Icing

1 stick (8 tbsp.) unsalted butter
1-1/2 c. stout beer, Murphy’s or Guinness
1 cup rolled oats, not quick cooking
2-1/4 cup sifted white whole wheat flour
1 tsp. baking soda
1/4 cup cocoa powder
1 cup granulated sugar
1 cup light brown sugar
1-1/2 tsp. kosher salt
3 large eggs, lightly beaten
1/2 cup chocolate chips

For Bailey’s Icing
4 tbsp. confectioners sugar
1 to 2 tsp Bailey’s Irish Cream

Preheat your oven to 350 degrees. Prep a 10-inch springform pan with non-stick spray or butter and flour, set pan aside. In a small saucepan, melt the butter over medium heat. Once the butter is melted, turn off heat and slowly pour the stout beer in the butter, whisking gently until the beer and butter are combined. It will foam slightly. Next, add the oatmeal and stir. Set this mixture aside while you prepare the cake batter.

In large mixing bowl, combine flour, baking soda and cocoa powder. In another bowl (medium size), mix the granulated sugar, brown sugar and salt. Add beaten eggs to sugar and salt. Take the stout and butter mixture from earlier and add to the egg-sugar mixture. Stir well. Now combine the wet mixture to the flour mixture and stir until dry ingredients are incorporated. The batter will be thick. Lastly, fold in the 1/2 cup of chocolate chips. (Tip: Lightly coat chocolate chips with your flour mixture (ahead of time) before adding to the batter. This helps the chips stay suspended in the batter when baking. They won’t fall to the bottom of the cake.)

Pour batter into your prepped springform pan and bake for 40-45 minutes, until cake springs back upon a light touch, or toothpick check in the center comes out clean. Remove from oven and cool completely. Dust with confectioners/powdered sugar and drizzle Bailey’s icing (optional).

For the icing: Combine sugar and 1 tsp. Irish cream. Add more liquor, 1/2 tsp. at a time, until consistency is like thick syrup and can easily be drizzled with a spoon or fork.

Another recipe you might like: Irish Soda Bread

Cranberry Raspberry Jello Crunch recipe

Over Christmas, I made a classic Jello recipe but changed up a few ingredients and steps. If you enjoy raspberry jello crunch, I have a recipe solution to using up some leftover cranberry jam with raspberry and cranberry jello. A nice balance between tart and sweet. I opted not to bake the crushed pretzels as stated in a lot of recipes – only because I didn’t have time. Just make sure you buy butter pretzels. Otherwise, you ought to take the extra step and bake your crushed pretzels with 1/2 cup of melted butter in a 350 degree oven for 10 minutes.

  • 1 3-oz. pkg. cranberry Jello
  • 1 3-oz. pkg. raspberry Jello
  • 2 cups boiling water
  • 1 to 1-1/2 cups of fresh cranberry sauce/jam
  • 1 cup butter pretzels, crushed (I used Rold Gold Butter Checkers)
  • 1 8-0z. pkg. cream cheese, softened
  • 1 8-oz. pkg. Cool Whip
  • 1/4 cup sugar (optional)

In a 4 to 6 quart glass serving container/bowl, empty contents of both Jello packages. Add the boiling water, and dissolve Jello. Mix in the cranberries after Jello is completely dissolved. Refrigerate until set (it may seem like a long time – give it 3-4 hours.).

Crumb topping: Mix cream cheese, Cool Whip and sugar until well combined. Spread on top of cold, set Jello. Top with crushed pretzels, and press down. Refrigerate until firm. Use a good size serving spoon when plating.

(I chose not to turn out (flip out) the Jello onto a serving platter… haven’t been totally successful with that.)

Related Posts with Thumbnails